
Every now and then, you need to back up to a Time Capsule, but you don’t have access to the router, or a wired network jack. You’ve got to go 100% wireless. I discovered a way to set it up 100% wirelessly, with no cables attached.
You’ll need:
- a Time Capsule (any model; an AirPort Extreme with an attached drive should work too)
- AirPort Utility v5.6.1 Launcher from ZCS
To install AirPort Utility v5.6.1:
- Download the Launcher (there are three download options; choose the leftmost one)
- Open your Utilities folder within your Application folder
- In the resulting window, drag each item (AirPort Utility 5.6.1, and the Launcher) one at a time to your Utilities folder. You may need to enter your computer password.
If you’ve never set up your Time Capsule before, use AirPort Utility (6.x, which has been included with macOS since 10.7 Lion), in the Utilities folder inside your Applications folder. Click the “Other Wi-Fi Devices” button in the upper left of the window, and choose your new Time Capsule.
AirPort Utility will scan your network for a while. When it’s done, if it does not say “This AirPort will create a network”, then click “Other Options” in the lower left of the window, and select “Create a new network.” Click Next.
Set up the Time Capsule using any temporary network name and password (but not your actual one). Click Next when it warns you that there’s no cable attached. Quit AirPort Utility when it’s done.
Now, join your new temporary network from the AirPort menu on your computer. (You won’t have internet access once you do.)
Open AirPort Utility 5.6.1 Launcher from your Utilities folder. (Or, if you’re still on Mac OS X 10.7 Lion, or 10.8 Mountain Lion, you can open AirPort Utility 5.6.1 directly, without the Launcher.) The first time you do this, you’ll probably get an Unidentified Developer warning. To bypass this, control-click on it, choose “Open”, and then “Open” again.
You’ll probably get notified that there’s a newer version of AirPort Utility. Cancel this. (If you don’t want to be hassled about it in the future, go to Preferences from the AirPort Utility menu, and uncheck all the boxes.)
If you’re using an 802.11ac Time Capsule (tall shape, rather than flat shape), you’ll be warned that the version of AirPort Utility you’re using is incompatible. Ignore this, and click “Continue”.
Select your Time Capsule on the left, and click Manual Setup at the bottom. If you get asked for Keychain permission, click Allow (and do this for any subsequent steps if you get asked). Click the Wireless tab.
Here’s the tricky part: hold down the Option key on your keyboard, then click the menu next to “Wireless Mode”. Choose “Join a Wireless Network”.
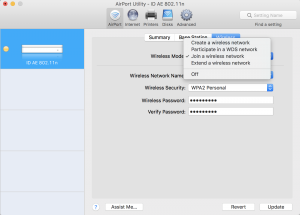
Choose your regular network under “Wireless Network Name”, and the password should automatically be filled in. Click Update.
Your Time Capsule will restart. Switch back to your regular WiFi network. Quit AirPort Utility.
Once the Time Capsule done restarting, you’ll be able to select it as a backup disk in the Time Capsule system preference (Apple Menu -> System Preferences -> Time Machine -> Select Backup Disk), as described in this Apple Support article.
You can also now maintain your Time Capsule using AirPort Utility 6.x, as you would normally. You only need version 5.6.1 to be able to get the Time Capsule into “Join a Wireless Network” mode; once it’s there, the current version of AirPort Utility works fine.
You can also use AirPort Utility 5.6.1, and the same method above, if you wish to create a WDS (Wireless Distribution System). This is not an option for the 802.11ac (tall shape) AirPort and Time Capsule; those only offer the “Extend a Wireless Network” option, which is much easier, but does not permit chaining WiFi devices.
AirPort Utility 5.6.1 is also useful for not permitting computers and devices to use an AirPort’s wireless network. This can be useful if you set up an AirPort Express to wirelessly extend a network for AirPlay wireless audio, in a home that is otherwise well covered by 802.11ac AirPorts. The Express only offers 802.11n, so you may want devices to use the other AirPorts instead. I may put up a separate post on this later.