For Mac users, certain items should always be compressed before they get attached to an email and sent off:
- Large attachments
- Folders (if you want to send an entire folder of documents attached to one email)
- Unusual file types (not MP3, PDF, JPG, Excel, or Word–these are usually okay), as they often get corrupted in transit over the internet
Here’s the quick and easy way to compress files and folders on your Mac before attaching and sending.
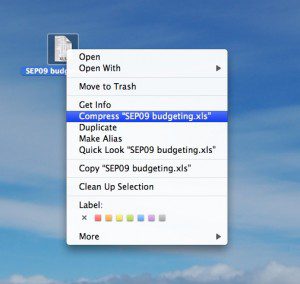
- Hold down the Control key (at the bottom left of your keyboard) and then click the mouse on any file or folder. A menu will pop up.
- One of the items in the menu is Compress “X” (X is the name of your file).
- Click Compress “X”. Your computer will automatically create a compressed version of that item in the same spot, with the ending .zip (so you know it’s compressed).
- Attach that item to your email, and send.

Another way to compress, with just one hand, is to right-click with the mouse button. If you right-click on any file or folder, you get the same menu, with the compression option. Yes, the standard mouse that comes with the iMac does have two buttons! You just need to enable the second button. Here’s how.
- In the upper-left hand corner of your screen, click on the Apple menu, and then choose System Preferences.
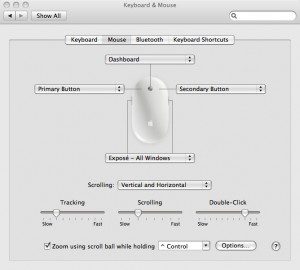
- Click on Keyboard & Mouse.
- At the top, click on the Mouse option in the bar.
- Set the right-side dropdown to Secondary Button. (You can also set the mouse for all kinds of other preferences here.)
- Close the window.
